vite-pretty-lint库是一个为Vite创建的Vue或React项目初始化eslint和prettier的库。
该库的目的是为了让开发者在创建项目时,不需要手动配置eslint和prettier,而是通过vite-pretty-lint库来自动配置。
源码地址:
使用
根据vite-pretty-lint库的README.md,使用该库的只需要执行一行命令即可:
// NPM
npm init vite-pretty-lint
// YARN
yarn create vite-pretty-lint
// PNPM
pnpm init vite-pretty-lint
这里就涉及到了一个知识点,npm init <initializer>,yarn create <initializer>,pnpm init <initializer>,这三个命令的作用是一样的,都是用来初始化一个项目的。
<initializer>是一个初始化项目的包名,比如vite-pretty-lint就是一个初始化项目的包名;
执行npm init vite-pretty-lint命令后,相当于执行npx create-vite-pretty-lint命令;
这里不多讲解,参考:npm init
源码阅读
打开lib/main.js文件直接看,一开头就看到了下面这段代码:
const projectDirectory = process.cwd();
const eslintFile = path.join(projectDirectory, '.eslintrc.json');
const prettierFile = path.join(projectDirectory, '.prettierrc.json');
const eslintIgnoreFile = path.join(projectDirectory, '.eslintignore');
一看这些名字就知道,这里是用来创建eslint和prettier的配置文件的,这里的projectDirectory就是当前项目的根目录。
当然现在这些暂时还没有用到,接着往下走:
async function run() {
let projectType, packageManager;
try {
const answers = await askForProjectType();
projectType = answers.projectType;
packageManager = answers.packageManager;
} catch (error) {
console.log(chalk.blue('\n👋 Goodbye!'));
return;
}
// 省略后面代码
}
一个run函数,这个就是执行命令的入口函数,可以将代码拉到最低下就知道了。
这里直接看askForProjectType函数,这个函数是通过./utils.js文件来的,进去看看
export function askForProjectType() {
  return enquirer.prompt([
{
  type: 'select',
  name: 'projectType',
  message: 'What type of project do you have?',
  choices: getOptions(),
},
{
  type: 'select',
  name: 'packageManager',
  message: 'What package manager do you use?',
  choices: ['npm', 'yarn', 'pnpm'],
},
  ]);
}
这里就是通过enquirer库来获取用户的输入,enquirer库是一个命令行交互的库,可以参考:enquirer
这里只有两个问题,一个是项目类型,一个是包管理器,包管理器就是npm,yarn,pnpm;
项目类型是用过getOptions函数来获取的:
export function getOptions() {
const OPTIONS = [];
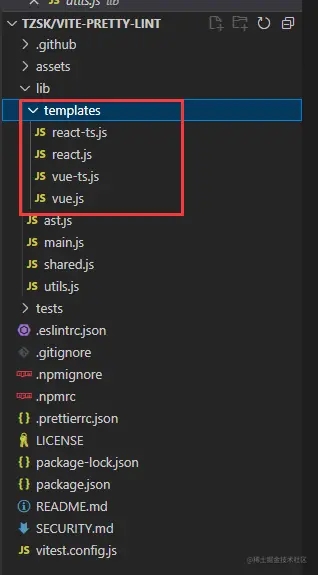
fs.readdirSync(path.join(__dirname, 'templates')).forEach((template) => {
const { name } = path.parse(path.join(__dirname, 'templates', template));
OPTIONS.push(name);
});
return OPTIONS;
}
getOptions函数就是获取templates文件夹下的所有文件夹,然后将文件夹名作为选项返回。
回到main.js文件,继续往下看:
const {packages, eslintOverrides} = await import(`./templates/${projectType}.js`);
const packageList = [...commonPackages, ...packages];
const eslintConfigOverrides = [...eslintConfig.overrides, ...eslintOverrides];
const eslint = {...eslintConfig, overrides: eslintConfigOverrides};
当用户回答完问题后,就会根据用户的选择来导入对应的模板文件,比如用户选择了react,那么就会导入./templates/react.js文件。
可以进去templates文件夹里面的文件看看,这里是vue.js文件:
export const packages = ['vue-eslint-parser', 'eslint-plugin-vue'];
export const eslintOverrides = [
  {
files: ['*.js'],
extends: ['eslint:recommended', 'plugin:prettier/recommended'],
  },
  {
files: ['*.vue'],
parser: 'vue-eslint-parser',
parserOptions: {
  ecmaVersion: 'latest',
  sourceType: 'module',
},
extends: [
  'eslint:recommended',
  'plugin:vue/vue3-recommended',
  'plugin:prettier/recommended',
],
rules: {
  'vue/multi-word-component-names': 'off',
},
  },
];
这里的packages就是需要安装的包,eslintOverrides就是eslint的配置,这里的配置就是vue项目的eslint配置。
然后下面就是一些合并的配置,都是通过shared.js文件来的:
// shared.js
export const commonPackages = [
  'eslint',
  'prettier',
  'eslint-plugin-prettier',
  'eslint-config-prettier',
  'vite-plugin-eslint',
];
export const eslintConfig = {
  env: {
browser: true,
es2021: true,
node: true,
  },
  overrides: [],
};
继续往下看:
const commandMap = {
npm: `npm install --save-dev ${packageList.join(' ')}`,
yarn: `yarn add --dev ${packageList.join(' ')}`,
pnpm: `pnpm install --save-dev ${packageList.join(' ')}`,
};
const viteConfigFiles = ['vite.config.js', 'vite.config.ts'];
const [viteFile] = viteConfigFiles
.map((file) => path.join(projectDirectory, file))
.filter((file) => fs.existsSync(file));
if (!viteFile) {
console.log(
chalk.red(
'\n🚨 No vite config file found. Please run this command in a Vite project.\n'
)
);
return;
}
这里就是通过commandMap来获取对应的安装命令;
然后通过viteConfigFiles来获取vite的配置文件;
这里是vite.config.js或者vite.config.ts,然后通过viteFile来判断是否存在vite的配置文件;
没有vite的配置文件就证明不是vite项目,然后程序结束。
继续往下看:
const viteConfig = viteEslint(fs.readFileSync(viteFile, 'utf8'));
const installCommand = commandMap[packageManager];
if (!installCommand) {
console.log(chalk.red('\n✖ Sorry, we only support npm、yarn and pnpm!'));
return;
}
这里就是通过viteEslint来获取vite的配置文件,然后通过installCommand来获取对应的安装命令。
vimEslint也是在shared.js文件里面的:
export function viteEslint(code) {
  const ast = babel.parseSync(code, {
sourceType: 'module',
comments: false,
  });
  const { program } = ast;
  const importList = program.body
.filter((body) => {
  return body.type === 'ImportDeclaration';
})
.map((body) => {
  delete body.trailingComments;
  return body;
});
  if (importList.find((body) => body.source.value === 'vite-plugin-eslint')) {
return code;
  }
  const nonImportList = program.body.filter((body) => {
return body.type !== 'ImportDeclaration';
  });
  const exportStatement = program.body.find(
(body) => body.type === 'ExportDefaultDeclaration'
  );
  if (exportStatement.declaration.type === 'CallExpression') {
const [argument] = exportStatement.declaration.arguments;
if (argument.type === 'ObjectExpression') {
  const plugin = argument.properties.find(
({ key }) => key.name === 'plugins'
  );
  if (plugin) {
plugin.value.elements.push(eslintPluginCall);
  }
}
  }
  importList.push(eslintImport);
  importList.push(blankLine);
  program.body = importList.concat(nonImportList);
  ast.program = program;
  return babel.transformFromAstSync(ast, code, { sourceType: 'module' }).code;
}
这里就是通过babel来解析vite的配置文件,然后通过importList来获取import的配置,通过nonImportList来获取非import的配置,通过exportStatement来获取export的配置;
参考:babel
接着往下看:
const spinner = createSpinner('Installing packages...').start();
exec(`${commandMap[packageManager]}`, {cwd: projectDirectory}, (error) => {
if (error) {
spinner.error({
text: chalk.bold.red('Failed to install packages!'),
mark: '✖',
});
console.error(error);
return;
}
fs.writeFileSync(eslintFile, JSON.stringify(eslint, null, 2));
fs.writeFileSync(prettierFile, JSON.stringify(prettierConfig, null, 2));
fs.writeFileSync(eslintIgnoreFile, eslintIgnore.join('\n'));
fs.writeFileSync(viteFile, viteConfig);
spinner.success({text: chalk.bold.green('All done! 🎉'), mark: '✔'});
console.log(
chalk.bold.cyan('\n🔥 Reload your editor to activate the settings!')
);
});
通过nanospinner来创建一个spinner,参考:nanospinner
通过child_process的exec来执行安装命令,参考:child_process
最后安装完成,通过fs来写入对应的配置文件;
总结
通过学习vite-plugin-eslint,我们学习到了在vite项目中如何配置eslint和prettier;
并且在这个过程中,我们学习到了如何通过vite的plugin来实现对vite的扩展;
还有这个项目的对vite的配置文件的解析,通过babel来解析vite的配置文件,然后通过importList来获取import的配置,通过nonImportList来获取非import的配置,通过exportStatement来获取export的配置;